Ultimate Facebook Profile Lock Down! – Part 2
 Welcome to the second part of this Facebook privacy series. In part one we looked at how to identify and restrict privacy settings on the Timeline, profile picture and the cover photos. In this article we are going to continue with other pages of the Facebook profile.
If you don’t have it already, open two Facebook tabs on your web browser. We are going to use the first tab to inspect content and second tab to change the settings. On the first tab click the padlock at the top right corner, on the dropdown menu click the “Who can see my stuff?” section and then click the “View As” link. Now you should see how your profile looks like to the Public. First, let’s examine the “About” page.
About Page
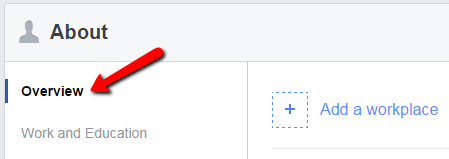
When you click the “About” page on your profile you should see a summary of your information on the “Overview” section. You can’t change any settings on this section. On the first browser tab click on each section under “About” page and check what information is visible to the Public. Now you can go to the second tab and start changing the permissions. Even if your profile doesn’t have any information visible to the Public, it’s still a good idea to go over each section and check who can see what!
The second section in “About” page is “Work and Education”. Click this section and check what information you have on the right side. You need to hover your mouse over each entry to make the setting icons visible. Change any entry that is set to “Public” (little globe icon). It’s probably safe to make info here visible to only your Friends.
The next section is “Places You’ve Lived”. Click on this section to view entries on the right side. Same as last section you need to hover your mouse over each entry to make the icons visible. Click on the icons and change any entries that are set to “Public”. You might notice that when you hover over entries under “OTHER PLACES LIVED” sub-section, only the “Options” setting is visible. To change the privacy settings on this section you need to click “Options” and then select “Edit”. On the pop-up page you should see the privacy settings icon at the lower right corner!
The fourth section “Contact and Basic Info” contains lot of juicy personal information! Identity thieves and your enemies will have a field day if this section is visible to the “Public”. You should think carefully about what info you want visible, even to your friends! Just remember even if you think it’s safe to make this info visible to your friends, rogue apps and malware could harvest your info through one of you friends’ profiles! Therefore, set all under “CONTACT INFORMATION” to “Only Me”. If you friends want to know your contact info they can always ask! Again you need to hover over each entry and click edit to get to the privacy settings. For email you can safely list your Facebook email that masks your real one. Only make your Website address visible if you’re already linking to your profile from your website! Otherwise, anyone can easily trace back to your profile using your website address! Under “BASIC INFORMATION” you can safely set Birth Year to “Only Me”. Remember if you hide your Birth Day and Month, your friends won’t get notification about your upcoming birth day! So set this to “Your Friends”. You can set other info below visible to friends. I am sure your friends would like to know about your gender, who you’re interested in and your political and religious views!
The next section is “Family and Relationships”. I am sure you know who your siblings and cousins are and you don’t need Facebook to remind you! Unless you have special reason for keeping them, I suggest you completely remove these entries from your profile. You can set your relationship status to “Friends” or private depending on your requirement.
The Final section is the “Details About You”. There is nothing special here. You can safely set these to “Friends”. Just make sure you don’t put any sensitive or personally identifiable information (PII). After making changes go to browser Tab one and check if everything is hidden correctly.
Photos Page
One of the most sensitive areas of Facebook privacy is photos! Most people share their personal photos without thinking much about privacy. For lot of different reasons (which I can’t go through in this guide!), It is a Very Bad idea to share your personal photos to Public!
First of all, you should use the “View As” tool on browser tab one to see what photos are visible to the public!! You may be surprised what you will find! You can go to photos by going to your profile and then clicking on the Photos menu item under your cover photo. On the photos page you can see that your photos are organised into four sections.
I found it easier to manage privacy settings of photos using the Albums section. When you upload photos to Facebook, they get automatically organised into Albums! For example, photos you publish from your phone and other mobile devices are automatically put in to the “Mobile Uploads” album. Unlike Albums you create yourself; you need to preview each photo on these auto albums to change the privacy settings. For manually created albums you can set privacy settings for the whole album instead of individually. Album thumbnail privacy icons reflect this difference.
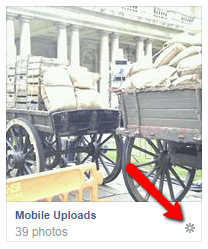
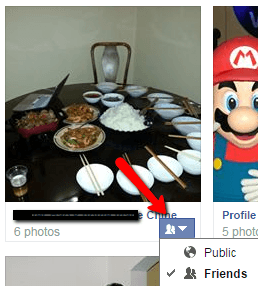
As you can see from the screenshot above, for manually created albums you can just click the small icon at the below right of the thumbnail and set the privacy for the whole album. For others, you need to go to the album and preview each photo individually to change the settings. You can find the privacy icon at the top right corner of the preview window.
Friends Page
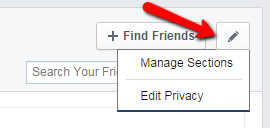
You have only few settings to change here. Click the Friends page and you will see the privacy settings icons on the right side under the Page menu. Click the little pencil icon and chose “Edit Privacy” to get to the privacy settings.
From the pop-up page you can change privacy settings for Friends list and people you follow. I don’t see any reason to hide your friends list as people will see who your friends are when they comment on your wall! Also there are other ways to find out your friends list. You can hide people you follow if you don’t want anyone to find out who you’re following! But again they might see your activity on the wall.
Other Pages (MORE)
When you click “More” you can access all other pages and sections such as Movies, TV Shows, Likes etc. You might think that there is no harm in making these sections available to public. But remember, even your music preferences and kind of movies you watch can say something about you! A smart person would able to gather bits and pieces to infer valuable info! Therefore, it is a good idea to make these sections visible only to your friends.
To change the settings, each of these sections have a little pencil icon at the top right corner. You can use this to edit Privacy for the whole sections.
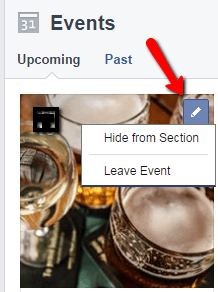 You may notice that Events, Reviews and Notes don’t have a privacy menu item on the top right corner. This is because these events are posted public by its creator and you only joined it! If you don’t like people to see Events, you can click on the little pencil icon on each event thumbnail and select “Hide from Section”.
For “Reviews” section, hover your mouse over each section and a little pencil icon will appear. You can click on this and select edit from the menu. Privacy icon is located at the right lower corner of the pop-up box next to post button. For notes, you can find the privacy icon under your name on the top. Just click and select the privacy setting you like.
For some reason Facebook won’t allow you to change privacy of sections like “Places” map and Groups you’re in! You don’t want everyone to see a large world map with all the places you’ve visited. Only way to get rid of this for now is to just hide it. Click the pencil icon at the top right corner and select “Hide Section” from the menu. For some reason if you want to get back the sections you’ve hidden, you can click the pencil icon on any section and select “Manage Sections”. From the list you can tick the sections you want to show again.
Conclusion
In this article we looked at how to restrict rest of the pages on your profile to limit public exposure. At first this may seem like lot of work. But when you do it once, maintaining it becomes much easier. Just remember this is not a onetime process! Facebook is known to change their privacy settings without notifying users! Therefore, it is a good idea to review your privacy settings every few months. In the next article I am going to show you some best practices when posting stuff on Facebook.
Graphics Art by NOREBBO