Ultimate Facebook Profile Lock Down! – Part 3
 Welcome back to the third part of this Facebook privacy series. In part 1 and part 2 I showed you how to hide your profile content from public view. In this part we are going to examine how to fine-tune the general privacy settings of your profile. General privacy settings determine the default behaviour of your profile when you share content.
Update:
Recently Facebook has introduced a super easy way to review your privacy called “Privacy Checkup”. This tool goes through the most sensitive parts of your profile to quickly adjust the settings! While it is a good idea to use this feature regularly to quickly check your privacy settings, you should also follow this guide to properly tweak other privacy settings to reduce the exposure.
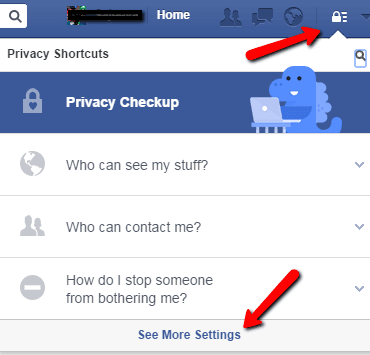 Let’s start by editing the “Privacy Settings and Tools” section. Click on the little padlock at the top right side of your profile page and click the “See More Settings” link on the bottom of the menu.
Under “Privacy Settings and Tools” section you will see 3 sub-sections with more settings. Now let’s go through each settings one by one.
Privacy Settings and Tools
Who can see your future posts?
Make sure this setting is set to “Friends”. Remember, Facebook has audience selector button available right where you post. If you use this button Facebook will remember that change next time you post overriding the default value here.
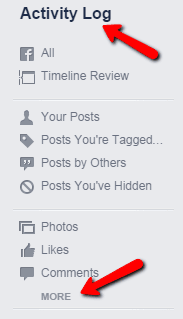
Review all your posts and things you’re tagged in
This link takes you to the activity log. Check out part 1 of this article to see how to use it.
Limit the audience for posts you’ve shared with friends of friends or Public?
This tool will change all content on your timeline you’ve shared with friends of friends or Public to Friends. Use this only if you have too much content to change using the Activity Log.
Who can send you friend requests?
Only change this to Friends of Friends if you’re getting uncontrollable amount of friend requests. Otherwise it’s safe to accept all friend requests as you can always ignore people you don’t want to add.
Whose messages do I want filtered into my Inbox?
Again only change this to Strict Filtering if you’re getting too much messages from creeps and weirdoes or you getting heavily spammed. In most cases Basic Filtering is fine.
Who can look you up using the email address you provided?
You don’t want people to find out your Facebook profile using your email! Therefore, set this setting to Friends. This is especially important if you’re not using your real name on your profile. Unfortunately, there is no way to completely disable this!
Who can look you up using the phone number you provided?
Same reason as above, you shouldn’t allow people to find your profile using your phone number. This kind of information always poses a great privacy risk. This should be always set to Friends.
Do you want other search engines to link to your timeline?
For improved privacy you should turn this option off by un-ticking the check-box. This will prevent search engines like Google from finding your profile. However, you will still be searchable on Facebook search! This is why it’s important to properly restrict your content.
Timeline and Tagging Settings
Who can post on your timeline?
It’s safe to keep the default setting Friends unless you’re only using your timeline to publish content. If you change this to “Only Me”, this will prevent your friends from posting on your timeline. Unfortunately, there are no granular options available at the moment to set custom groups here.
Review posts friends tag you in before they appear on your timeline?
It’s always a good idea to review posts or pictures you’re tagged in before allowing them on your timeline. You seriously don’t want that drunk photo of you appearing on your timeline because your friend thought it’s not that inappropriate!
Review what other people see on your timeline
This link takes you to the “View As” tool. This tool allows you to check how your profile looks to the public and specific people. You should always use this tool to review your profile after making any changes.
Who can see posts you’ve been tagged in on your timeline?
Unless you have special reason, you should always set this to Friends. You can always check your posts before allowing on timeline if you have the tag review setting turned on as described above.
Who can see what others post on your timeline?
Same as above, unless you have a special reason, it is better to just keep this set to Friends. However, there won’t be any reviews before posts appear on your timeline. Only posts you’re tagged in can be reviewed before posting!
Review tags people add to your own posts before the tags appear on Facebook?
It may seem it’s a good idea to keep this option on. However, it can get really annoying when you have to manually approve lot of tags by your friends. Therefore, it is best to keep this off. Only use it in a situation where you want more control over what your friends tag!
When you’re tagged in a post, who do you want to add to the audience if they aren’t already in it?
If this is set to default value Friends, this means when you’re tagged in a post, you and your friends can see the post — even if your friends were not in the original audience. If you don’t want everyone to see when someone else tag you in their post, you can set this to “Only Me”.
Who sees tag suggestions when photos that look like you are uploaded?
Facebook use facial recognition software to automatically identify people based on their previous tags. If you enable this setting it will auto recognise your face and suggest your friends to tag you in photos. While this may be convenient, it could also be a privacy concern. I personally like to keep this setting off (“No One”).
History Logs
Most of the time we forget that Facebook saves all of our searches, chats and other activities. Over time these logs can leave a large foot print. Therefore, it is important to review and clear unwanted history logs.
Search History
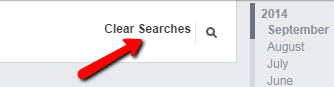
Facebook search is a very convenient tool to quickly get to someone’s profile. However, what most users don’t know is that all of your searches are saved in a log indefinitely! This can leave a nasty trail if you’ve been doing things like stalking your ex. Even though Facebook tells us that this history is only visible to just us, old searches could still appear on auto-complete. Also imagine a situation where someone else had access to your profile and they can now see all your search history for past years!
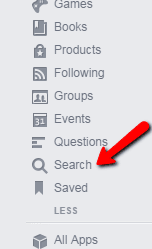
To clear Search history: click on the padlock at the top right corner, then click on the “Who can see my stuff?” from the menu and click “Use Activity Log” on the sub-menu that appears. On the activity log page you need to click “more” on the left side menu to reveal rest of the options. Once you click “more”, you will see the “search” option near to the bottom. Click this to open search history. Finally, click the “Clear Searches” link at the top right corner of the page and confirm your action on the popup box. Warning: you won’t able to recover anything once you clear the history.
Chat History
 Even with recent privacy concerns lot of people still use Facebook chat. Just like your search history Facebook saves your chat sessions indefinitely until you manually delete them. You should delete any chat history that might contain sensitive or personal information. It is also a good idea to delete any old logs that are no longer relevant.
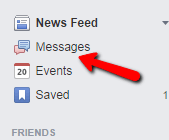
To access your chat history: click “HOME” at the top of you profile page and click “Messages” on the left hand side menu.
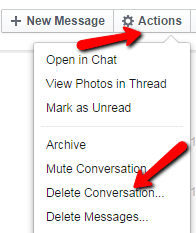
To delete a conversation: click on the conversation on the left side, click on the “actions” button at the top right and from the menu select “Delete Conversation”. Be warned: this will delete the whole conversation and you won’t able to recover it. You can even delete selected messages in a conversation by choosing “Delete Messages” on the same menu.
Conclusion
In this article we looked at how to change the general privacy settings of your Facebook profile to maximise confidentiality. We also looked at how to clear unnecessary history logs that can accumulate over a long period of time. Remember: this is not a onetime process! You should consider taking some time to review your profile every few months. Always practice common sense when sharing online.
If you like this article please share. If you have any question or suggestions, post a comment below.
Graphics Art by NOREBBO
Jpt
March 1, 2026 - 9:55 am
98876