Ultimate Facebook Profile Lock Down! – Part 1
 Privacy and Facebook don’t go that well together. While Facebook wants us to share our personal information openly with everyone, most of us just want to share it with only people we know and trust. Thankfully, over the years Facebook has added some privacy features to reduce the exposure. However, most of these features are hard to find and not very obvious to novice users.
In this article I am going to show you how to use these features effectively to protect your Facebook profile privacy.
Before we begin, open a browser tab and login to your Facebook account. After you login, open another browser tab (or right-click on the tab and chose Duplicate on Chrome) with Facebook. You should now have two Facebook tabs open! We are going to use first tab to monitor and check for changes and second tab to change the settings.
On the first browser tab, click the little padlock at the top right corner of the Facebook page. On the dropdown menu click the “Who can see my stuff?” section and then click the “View As” link.
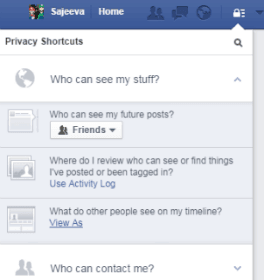
Now you will see the profile the way it is visible to the public. Public means anyone that is not on your friends list and friends that are on the restricted list. This is a great feature to quickly check what is on your profile is exposed to the public. First, scroll down on the timeline and check what information is visible. After you have an idea what you want to restrict, go to the second browser tab and use the “Use Activity Log” to change the settings. To access the “Use Activity Log”, on the second tab, click on the same padlock at the top right corner, click on the “Who can see my stuff?” and then click on the “Use Activity Log” link. Let’s examine each section on the timeline closely to tweak the settings.
Timeline
You can use the “User Activity Log” to change the little globe icons to “Friends” to stop them from being viewed to the public. Although it is possible to use the Activity Log alone for this task, I found it easy to use the “View As” to locate the Public content and use Activity Log to quickly change the settings.
You have too many public posts to change manually? Fear not! Click the padlock icon at the top right corner, chose “See More Settings” from the dropdown menu and select “Privacy” from the left hand side menu. In that chosen category you should see three sections with more privacy settings. Click on the “Limit Past Posts” section and you should get a new button with a warning massage.
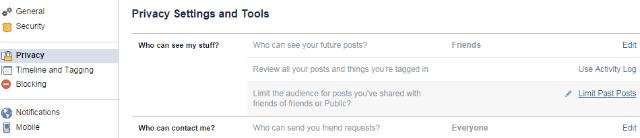
Click the “Limit Old Posts” button and all your existing content shared with friends of friends or Public will change to Friends. Therefore, make sure to make a note of any custom settings as this action might override these settings.
Profile Picture and Cover Photo
After you review and fix the privacy of your timeline, next thing you have to check is your profile picture and the cover photo. On the first tab (assuming you still has the “View As” tool set to Public), click on the Profile picture. You might notice the navigation arrows that let you browse all of you profile pictures. This is because by default Facebook set all of your profile pictures to Public. You may only want to make your current Profile picture visible to the Public! Thankfully, there is a way to change this. Go to the second browser tab and click on your Profile Picture. Once the picture is visible on the gallery view, you should see the privacy setting icon (Globe for Public) at the top right corner under your name. Click this icon and change it to Friends. You will have to do this for each profile picture excluding the current one.
Same applies to your Cover photo. Click on the cover photo on your profile and use the navigation arrows to browse through them to change the settings. If you’re serious about privacy, only your current Profile picture and cover photo should be visible to the Public.
Conclusion
In this article we learned how to Audit your profile and effectively change settings to protect your privacy on Facebook. In this first part, we closely examined the Timeline, Profile picture and cover photos.
In the next part of this series I am going to show you how to effectively lock down other sections of your profile, so stay tuned. If you have any questions or suggestions, please leave a comment below. And if you like this article don’t forget to share.
Arki-Ologist!
September 2, 2014 - 11:16 am
Well Written! Detailed post 🙂